So here is Part 2 of 2 Bra Basics
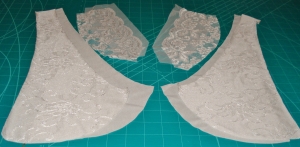
You have read Part 1 of Bra Basics, and all the references, and purchased everything on the list. You have drafted your pattern on tissue and carefully cut your bra fabric out!
We are now ready to proceed! Some Assembly required :0)
Note: Were my instructions differ from your pattern, follow your pattern instructions.
Reality Check: All your pieces of fabric are cut out and ready to assemble. Don’t cut your elastic yet!
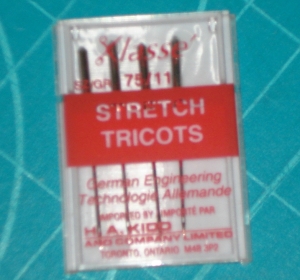
 I am lining mine, Netting under the upper cup, and a 30% DOGS stretch tricot lining inside the 40% DOGS Floral Jacquard. I have basted the pieces together using a Ballpoint machine needle #75. If your sewing machine does not have a stretch stitch, use and elongated zigzag stitch. Some experimentation may be required.
Note: Basting pieces together using a straight stitch at the longest stitch setting. Don’t back stitch when basting this increases bulk. Cut long tails to smooth out any gathering. Make the seam allowance less than 1/4″. Use only a few pins, stitch slowly, stop and adjust often.
Sewing Tip #1: sew with the heavier fabric on the bottom for best results.
The great thing about stretch fabrics, they are very forgiving. A little stretch to even things out is allowed.
Sewing Tip #2: Stitch the lower cup to the upper cup, with the lower on the bottom. This makes it easier to work your way around the curve.
Then comes the ticklish part, the seam down the cup is Top Stitched down to the outside of the cup. You are going to have to feel your way down the back of the seam while sewing from the front. Go slowly, check constantly that everything is where it needs to be.
Note: You may have noticed that I like to sew things on the side that will be visible. This means that you have to go slowly, check often and feel your way along.
Look, I have been doing this for years and sometimes it doesn’t work. Oh well, move on to the next step :0)
This is where a little extra time and attention pays off. Watch closely to match up lace patterns to get as close to a mirror image as you can. When it works you can really see the difference lining things up and pin placement can make.
Reality Check: Cups are together, there are no fabric pcs leftover ;0)
We are ready to do the shoulder straps and elastic.
Strap assembly: (Make 2) Cut 16″ of 1/2″ Plush strap tape. Taking the slider, fold 1″ through the middle of the slider, sew down backstitching 3 times. Take the matching ring, Cut (2), 2″ pcs of 1/2″ Plush strap tape fold shiny side out through ring.
Elastic: (For my Bra) I cut (2) 14 1/2″ pcs of 1/4″ Plush picot edged elastic. I cut 28″ of 1/2″ Plush picot edged band elastic. for the upper edge
(Your elastic measurements will likely be different.)
Note: that the actual measurement for the Band is 32 1/2″ relaxed, we cut 28″
and the actual upper edge is, 17″, we cut 14 1/2″
Yes this will work with a minimum of fuss!
Elastic Application Part 1
Upper Edge
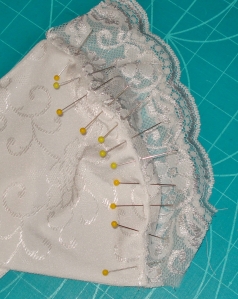
Fold the upper edge on the each side of the Bra, place (3) pins to indicate quarters. With the flat edge of the elastic against the upper bra edge right side facing and plush side up pin the elastic to the edge. Working from the centre back, pin half of the elastic flat and relaxed to the half way point on the fabric edge.

Upper: Plush back picot edge elastic, plush side up flat edge to selvage edge of Bra. Note placement of tab with ring.
Fold the remaining elastic in half and pin the to the remaining quarter pin and top edge on the bra. This little bit of gathering will help with the shaping of your cup.
At this point look to your pattern for the strap locations on the back upper part of your Bra. Pin the tabs with the rings in place with just a little showing above the edge. (these are going to need some backstitching as you go over them. We’re going to Zigzag the elastic onto your project, select narrow zigzag stitch and medium length stitch. Zigzag backstitching at the beginning and end of the row. Place the edge of the zigzag close to the picot edge of the elastic.
Bottom Band
Place pins at the quarter points along the edge of the bottom edge of your bra. Do the same with your band elastic. As before, flat edge of the elastic against the bottom edge of the bra edge right side facing and plush side up pin the elastic to the edge at these quarter points. Zigzag backstitching at the beginning and end of the row. Place the edge of the zigzag close to the picot edge of the elastic.
Reality check: Your Bra is all together except the straps.
Elastic Application Part 2
To reduce the bulk under the elastic carefully trim off fabric under the elastic close to the Zigzag. Be really careful, you nip the elastic and the show is over!
Now fold the elastic to the inside and pin in place.
Note: You may have noticed that I like to sew things on the side that will be visible. This is the exception! You will be sewing the elastic Bra band to the inside of the Bra along the flat edge of your Bra. Set your sewing machine to 3-step zigzag (in my case stitch width 5.5) Test out on your own machine to see what stitch width suits your project.

Folded and sewed down using 3 step Zigzag. If you don’t have this stitch on your machine, use a long plain zigzag stitch.
Thread your straps through the rings, the plush side down (what will be next to the skin) thread through sliders. If you miss this step you will be in big trouble at the end of this step!
Then fold and pin as you did the band. Use the regular setting for 3-step zigzag on this narrower elastic. I have to admit I’m a belt and suspenders kinda girl. Before I start to sew down the Upper elastic, I tact down the straps at the top of the cup and the band.

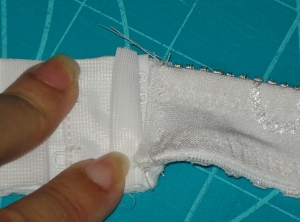
Fold the strap under the edge elastic. This will make a smooth transition and create stability and better support.
Nothing more embarrassing than to have something let go when your dancing up a storm ;0)
Final step: Hook and Eyes
Cut your tape to size, open the lips of the H&E tape and sew with a straight stitch, on the eye side, lip on the bottom, front side up. Stretch the body of the Bra or compress slightly to fit the tape.
Then zigzag the top lip down. The hook side of the tape always presents a little more of a challenge. With the Hook side down (ready to fold back) Stretch the body of the Bra wrong side up on top and compress slightly to fit the tape.
To make the hooks sit in the right position you will have to trim off some of the excess close to the fold. Then zigzag the other lip down.
I used strip Hook and Eye tape, so I need to zigzag the top and bottom of the Hook and Eye tape.
DONE!

Unfortunately Judy and I are not quite the same, and the turtleneck she is wearing is stretching things a bit. I am really pleased with the results. Been ages since I made a white one.
Not that hard really once you know the steps :0)
My Modifications to this pattern: Fully lined, Soft netting under lace portion of cups, Full shoulder straps, 1/2″ band elastic rather than 3/8″
Here is a rather good on line Bra Video Tutorial by Jalie Sewing patterns
FO’s 2013 = 90
WIPS 2013 = 10
Used of 38 purchased patterns from Rav = 9 (29 to go)
Stash Used 2013 = 77
Sewing FO’s = 3 + 1 = 4
Books 2013 = 30
Thanks again for visiting,
cya next week :0)
I’m off to visit Tami’s, then on to my blogwalk
come join me in the blogpond :0)
Find me on Ravelry.com and also my Etsy shop
Oh and FYI I have 50% off Back to School Sale at my Ravelry Shop, now we all have so much time with the kids in school. Sale lasts to the end of the month. 3 months till Christmas people!


Sep 22, 2013 @ 17:09:02
That is really cool! Hopefully you get a better fit from it than the store bought bras.
Sep 25, 2013 @ 11:47:55
Your bra turned out wonderfully!
Thanks for linking to Tutorial Thursdays on Marigolds’ Loft.
Your tutorial will be featured tomorrow 🙂
Look forward to seeing you again this week.
x
Natalie
Marigolds’ Loft